Tuesday, February 8, 2011

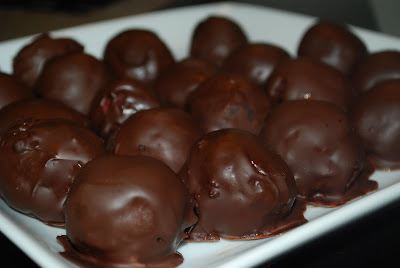
Red Velvet Cake Balls

I've been working on cultivating an interest in football. For awhile. My family isn't huge on sports, so it's just not something that I grew up with. Leon, most of our friends and the entire city of Tallahassee are football crazy. Generally this is about what watching football with me. But I actually did enjoy the Super Bowl this year - what's better than an evening with good friends, a good game and good food? I made the most sinfully delicious sweet treat for the game: Red Velvet Cake Balls. I warn you - these are only okay to make if you have an exit strategy (such as a Super Bowl party) or an iron will.
Bakerella is apparently to blame for bringing these into the world. They're like truffles, but instead of chocolate inside it's cake...and frosting. The good news is that they're very rich and one (or a couple) are totally satisfying. These would be super cute for Valentine's Day. Just be prepared if you bring them around too many young gentlemen as they conjure an image of a certain iconic South Park episode. The sad part is that these would probably be pretty delicious with a little sprinkle of sea salt on top.
They're a little time consuming, but not overly challenging. These were a huge crowd pleaser and, honestly, probably one of the most delicious things I've ever made. Check out Bakerella's site and start figuring out when you bring your own batch of these into the world. You can bake the cake and roll the balls ahead of time. The chocolate also needs some time to harden, you'll probably want to give it at least an hour.


Ingredients:

1 box Red Velvet cake mix, prepared according to package directions in 13x9 inch pan
1 16 oz. can of whipped cream cheese frosting
16 oz. semi-sweet baker's chocolate
Wax Paper


Method:

1. Bake cake per package directions. When it has fully cooled, crumble the entire thin in a large bowl.
2. Slowly mix in the frosting. Hands are probably the best way to go.
3. When cake and frosting mixture is homogenous begin rolling it into balls. I scooped out heaping tablespoons for uniformity - there will be around 45-50. Refrigerate the balls for at least a few hours or overnight.
4. Lay wax paper on flat surface. Melt the baker's chocolate four or five squares at a time in a microwave safe bowl for 30 second intervals. Stir until chocolate is all melted.
5. Drop the balls in one at a time and spoon chocolate over them instead of rolling. Lift the cake balls out of the chocolate with a fork so that the excess drops off.
6. Lay the cake balls on wax paper to harden.

Friday, February 4, 2011

On becoming a Valentine's Day convert

It's crazy to think that I've been in the dating world for a decade, but I suppose measuring things in decades is all part of getting older. In those years I've had Valentine's Days of all shapes and sizes, though I seem to have had more bad ones than good. The one that sticks out most in my memory is the first year that I had a boyfriend on Valentine's Day. I carefully selected various cutsie gifts along with a couple of CDs by his favorite punk bands. I spent the better part of the afternoon primping getting more and more excited for my first Valentine's Day as part of a couple. I was fifteen and neither of us had driver's licenses yet, so my father drove me over to his place where I was supposed to meet him after he got off work.
My dad waited as I walked to the door and rang the bell, box-o-gifts in hand. The house was awfully dark and and my disposition became exponentially less sunny as I started to realize that no one was home. Walking back to the car and getting in was the probably the worst part of the whole evening. Fathers aren't supposed to like their teenage daughters' boyfriends anyway; but they're especially not supposed to like the ones who ditch their little girl on her inaugural V-Day. After sitting at home and wallowing for awhile I got a call from the guy, who had been held up late at the office - and by 'the office' I mean his bus boy job at a local pizza place. He was extremely apologetic and thusly forgiven, but this was the first of many experiences that kind of ruined Cupid, candy hearts and chocolate that comes in heart shaped boxes for me.
These days, I'm a recovering V-Day smack talker. I recognize the weirdness of my boyfriend having to buy me flowers every February 14th or face Cupid's and my wrath. I've decided to let Valentine's Day back in, albeit on my terms.
Rule one: Be honest. If you want flowers, dinner, chocolate or any of the other staples - tell your boyfriend. If you tell your significant other that you don't want want to do anything then you're not allowed to get angry when that's what you get. If you have a naturally romantic man in your life then this rule may not apply to you, but the other 90 percent of you need to keep this in mind.
Rule two: Valentine's Day is supposed to be about love and couples. Yes, it's obviously something that ladies get more excited about, but I think a lot of ladies end up disappointed because they put too much pressure on their guys, give little direction and, ultimately, end up disappointed. And in all honesty, I've been there myself.
Rule three: Do not compare your V-Day swag to everyone else's. Remember that episode of The Office where Pam told Roy that she wanted a laid back V-Day, then she got nothing and watched Phyllis get flowers, candy and stuffed animals non-stop? This ties in with rule one, but try to remind yourself how nice it is to be together on Valentine's Day and focus on the good things, not three bouquets, mass of balloons and giant box of chocolates that your roommate got.
Ok, those are pretty much the rules, but I'm becoming much more of a Valentine's Day optimist than I used to be. I've come full circle - I think I may have even written an Anti-Valentine's Day column during my college newspaper days. This year I even made crafts!
What are some of your best, worst and funniest Valentine's Day memories? Are there any rules you would like to add?


I can't help but find these anything but sinfully cute. I'm definitely not crafty;
however, I think these came out pretty cute.
The little mailboxes were a whopping $1 at Target, as were the packs of stickers.

We can leave each other little notes in our respective boxes and pop up
the little flag as an indicator.
Is it just me, or are these super cute and mushy? I sense I'll be pulling these
out every year. I love starting traditions.

Thursday, January 27, 2011

The Miraculous Microplane


Do you have a Microplane Zester? No? Grab your keys, go to the store and buy one right now!

....Alright, you're back and you didn't forget about me. Awesome! You've made a great investment. You'll be able to zest citrus to level that is probably unprecedented with your old measly grater. But in all seriousness, you really should get one - especially if you are a fan of parmesan or other hard cheeses. It may sound crazy, but parmesan tastes totally different when you grate it yourself versus when you buy it pre-grated. You only have to do it yourself once, and you'll be hooked. They're a little pricy (I think around $17), but totally worth it.
But those of you who are already Microplane converts may be interested to know that this favored kitchen tool was initially made for something a bit different: woodworking. Yep, initially the Microplane was meant to be mounted on a hacksaw. Suddenly the demand changed and people were using the Microplane to zest citrus into marinades for pork tenderloin instead of purchasing it for, well, whatever it is that people do with wood. Moral of the story: we foodies are innovative people - think outside of the box, folks!

Fluffy, nutty, perfect parmesan

Brown Sugar Acorn Squash

I've read quite a few interesting food related things this week that I would like to share. First was a tip I read on Huffington Post about being too calorie concerned. The dietician/writer wasn't at all suggesting that calories are not important, rather, she was discussing the problem with choosing something low calorie for that purpose without thinking about better options. The example the author used was between two 100 calorie options: 11 gummy bears or 18 strawberries. I've read several things damming 100 Calorie packs for various reasons, and I've never agreed; however, something about this comparison made me really think about how much more you can get out of your food by making good choices. And really, is there anything more enticing than a big bowl of strawberries?
I also read that Jamie Oliver is doing another season of Food Revolution - this time in Los Angeles. If you didn't see the first season, you missed out. Jamie Oliver is a chef from England who helped improve the British school lunch system and he has started trying to do the same in the United States. The first season is on hulu right now - check it out!

Rosted Acorn Squash


1 acorn squash should serve two people as a generous side. Cut squash in half and scoop out seeds.
Rub each half with 1/2 tablespoon of butter substitute and 1/2 tablespoon of brown sugar. Bake at
350 degrees for about 45 minutes until squash is fork tender.

Friday, January 21, 2011

Food & Thought


It’s January, which of course means that I’m on a quest to be healthier, fitter, blah, blah, blah. But it’s going really well, I’ve lost like eleven pounds. Some of that was winter break weight, but I’m still counting it as a win. I saw this online today and thought it was great, and it reminded me of some wisdom that I got in a college nutrition class awhile back. I think our [unrealistic] professor told us that when you go grocery shopping, you should only shop the perimeter of the grocery store and not purchase shelf items. While I think this is perhaps a bit on the unrealistic and extreme side, there is a lot of wisdom here. Think about what most grocery stores have around the perimeter: fresh produce, dairy, fresh poultry, meat and fish. That just about covers the food pyramid! I'm really refocusing and the majority of what I'm eating is fruit, veggies and dairy. I don't think I realized how far off I was on getting the right amount of fruits and vegetables in, but it's exciting to reassess!


My cooking is a little limited at the moment, but I hope to share some of the healthy things that I'm implementing for myself here. Also, on the topic of portion control, I also came across this lovely image. It's definitely something to think about: how big is the actual capacity of your stomach versus the things that we put in it? Yeah, it's good that the 30 ounce trenta that Starbucks is rolling out is coffee and not a hamburger, but if you get a beverage that has whipped cream, whole milk or sugary syrup, that's A LOT! Comedians have poked fun at Starbucks' naming scheme (tall, grande, venti - and now trenta) because "tall" is the smallest, but it means big, "grande"" also means big and "venti" is somewhat made up - it means 20 in Italian, which fits because the venti size beverages are 20 ounes. And, of course, "trenta" means thirty. But keeping with the theme of portions, all of these coffees are actually pretty big - the "tall" is 12 ounces - which is actually kind of a lot of coffee if you think about it in terms of your coffee cup at home. No judgment here though, I usually don't head out to my first class with less than three cups of coffee, but I have switched from fat free creamer to fat free milk :)

Saturday, January 15, 2011

Birthday Baked Alaska


When I was little I remember my father always citing Baked Alaska as his most favorite dessert. He brought it up semi-frequently, but I cannot remember us ever actually having it. It has been quite a few years since he has mentioned it, but for some reason that memory popped into my head this last year and I filed it away for my dad's birthday. In case you're unsure of what Baked Alaska is, it's a dessert with a cake base, topped with an ice cream dome, then covered in meringue and baked for a few minutes so that the ice cream is still frozen and the meringue is golden. It's unusual, delicious and not overly complicated - though a little time consuming. It's actually a perfect dessert to make ahead of time and then throw in the oven for a few minutes when you're ready to serve it.
I knew it would be a really nice surprise, though I had a bit of anxiety about the execution and lack of kitchen at my parents' house. My dad's birthday is two days after Christmas, so this was perfect because it's so different and non-repetitive from usual holiday fare. Plus, let's face it - it sucks to have a birthday within a couple days of Christmas and we always try hard to make my dad's birthday special. While making a complex dessert like this that requires a couple days' worth of time for preparation is difficult to secretively do while you're in the same house as the person you're surprising, my mother and I pulled it off.
A couple of days before I even asked what his favorite ice cream flavor is (maybe this is something I should have already known, but I didn't). His very definitive answer: Spumoni. For those of you who do not know, it's kind of like Neapolitan, but the flavors are chocolate, pistachio and cherry (typically). This made things slightly more complicated, because sponge cake is usually used for the cake layer and that just didn't seem like it would be the perfect pairing with the spumoni. But then a genius thought came to me: how about a brownie base - it would go well with the spumoni and the marshmallowy deliciousness of the meringue.
Putting ice cream into a 500 degree oven is most definitely a little nerve wracking - but my dad was so surprised and touched at the personal nature of his surprise birthday desert that I only regret not thinking of this sooner. I was talking to my grandmother and apparently she used to make Baked Alaska when my dad was a kid, so I'm especially excited that I've brought back something of a family tradition.

Baked Alaska

Ingredients:

2 Cartons of Dreyer's Spumoni (or any other flavor)
1 standard size pkg. brownie mix - made according to package directions in 8 inch or 9 in round cake pan
Non-stick spray

For the Meringue:

8 egg whites at room temperature
1/4 tsp. cream of tartar
1 cup superfine sugar
1.5 tsps. vanilla extract

Method:

1. Before you begin, find a large bowl (around 3 quarts) that will work with your cake pan (the diameter needs to be about the same since the ice cream dome will be sitting on top of the brownie base.


2. Line said large bowl with plastic wrap and spritz very lightly with non-stick spray. After ice cream has sat out for ten minutes or more (it should be slightly melted) begin scooping it into the bowl. Alternate the different colors for a marbled effect. Pack the ice cream fairly densely and put back in the freezer. Freeze for at least four hours and up to 24 hours.
3. Bake the brownies according to package directions, then allow to cool.


4. When brownies are cool, remove them from their pan and put them onto a large plate that can go into the oven. It will need to be fairly large - remember that you still need to put on the meringue on!
4. Carefully remove the ice cream dome and place it on top of the brownie base. Put back into the freezer.
5. When eggs are at room temperature, crack them into a large bowl and add the cream of tartar. Use an electric mixer with a whisk attachment to beat the egg whites for two minutes on medium-high speed. Increase speed to high and then slowly pour in the sugar and beat until stiff, glossy peaks form. Peaks are stiff when they stick straight up and don't bend, like so:

6. Remove the brownie and ice cream from the freezer. Cover the ice cream with meringue, starting from the top down. Try to keep the meringue even and thick - it's important for insulating the ice cream from hot oven! Use the back of a spoon to make peaks with the meringue. Freeze for at least four hours and up to two days.
7. When you're ready to serve the cake, heat the oven to 500 degrees. Put the cake into the oven for a few minutes and watch it closely! Meringue should be golden, it shouldn't take more than five minutes. Let the cake sit for a few minutes so that it will be easy to cut. Enjoy!


The Baked Alaska, Pre-Oven


Post-annihilation :)

Monkey Bread


Although the holidays have come and gone, the bone-chilling cold is still with us - yes, even us here in the sunshine state. Ok, our bones may be chilled a little more easily than all of you to our north, but still. I even spotted icicles hanging by the entrance to the law school the other day. I'm still new to this whole being-a-Floridian thing - but that seemed pretty significant. So, where ever you may be I hope the future holds a party with friends or a lazy day cuddled under the blankets munching away on one of these. I made two this holiday season - one for Christmas and one for a friend's party - and it's always a crowd pleaser.
This is super easy - I made it in my mother's "kitchen" (as pictured below).

Monkey Bread

Ingredients:

3 10 oz. cans of refrigerator biscuits (go for the buttermilk - the flakey ones or the butter flavored ones don't quite work right)
2 tbsps. cinnamon
1 stick of butter
1 cup white sugar
1 cup packed brown sugar
1/2 cup pecans

Bundt Pan
Plastic bag


Method:

1. Preheat oven to 350 degrees.
2. In a gallon sized ziploc bag mix the sugar and cinnamon - shake to homogenize.
3. Cut biscuits into quarters then put dough into the cinnamon sugar mixture and shake until coated. Do a couple biscuits at a time to keep from overcrowding. Layer the biscuit pieces in a greased bundt pan and intermittently sprinkle the nuts throughout.
4. When all of the biscuits are in the pan melt the butter and brown sugar in a saucepan. When melted, evenly pour the butter and brown sugar over the biscuits. Bake for about 45 minutes, until biscuits are golden and cooked through.

Note: It's kind of tricky to tell when the monkey bread is done, but the good news is that it's easy to pull a piece out and check! Let the monkey bread cool for at least 20 minutes, then turn over onto a plate to serve. It's best to just pull it apart instead of cutting pieces. Enjoy!